Wednesday, October 9, 2013

"Big Kid's" Pink Couture-Style Headband

Ok, this time I REALLY did it. For real. I produced something that I am really proud of and (probably) saved myself a whole lot of money to boot. You know those gorgeous couture headbands they sell for the adornment of females from birth and on up? The really big ones, with clusters of all manner of wonderfully constructed fabric flowers accented by things like pearls, gems, lace, feathers, marabou and any other sort of prettiness you can imagine? The kind of thing that features prominently in newborn photography and seems to be under strict regulations to be larger than the baby's head, taking all attention away from the actual baby and consequently begging this question: why go to the trouble of undressing the baby, taking the risk of all surroundings getting soaked in a warm and non-cleansing liquid, getting the baby to fall deeply enough asleep so she will lie still in all sorts of unnaturally contorted positions on top of or inside all sorts of odd objects of all sorts of odd shapes, colors, and textures, often perched in ways that appear frighteningly precarious, as appears to be de riguer these days, merely for the sake of getting the oblivious baby in the picture when all you really want is the ginormous HEADBAND??? Raise your hand if you're still with me, because I'm not quite sure what it was I was originally talking about at the beginning of the world's longest run on sentence.
So anyway, if you still don't know what I mean, just google images of couture headbands. You're bound to figure it out quickly, if eye-poppingly. Google RULES, y'all. These things are trendy, and mostly expensive. I've seen some over $40! For a single hair accessory! Insane, right? But...but...but...I wanted one! Because I like to be trendy. No, scratch that. My wardrobe is a cross between an elderly toad and an explosion of black shapelessness. But, man, I like my offspring to be trendily dressed. Oh how I care about their appearance. Rather foolishly, I imagine, because all THEY seem to care about is comfort, playing in the dirt, and colorful ice pops. See where this is going. Yeah, obviously I ought to just keep them in soft dark-colored garments at all times, and often I do, though I try to ensure, as much as possible, that those are stylish and nice-looking soft dark-colored garments. But I do so love to deck them out all spiffy on occasion. So, lacking a tiny moldable girl baby of my own, I determined that my half-grown girl child must have a gorgeously decorated headband, which, while not quite outshining her entire head in size, could be constructed to come rather close.
So I spent some time planning this (okay, full disclosure: I spent an insane amount of time googling approximately three gazillion pictures and tutorials until I finally made up my mind on what, exactly I wanted it to look like and then attempted to reconcile that with what I felt I was capable of creating). But then I got to work, and after a full set of burnt fingers, a couple of mess-ups, frustrated stomping-offs, and subsequent re-dos, I DID IT! I copied the experts and produced something that is, in my humble opinion, awesome. And I am just so totally blown away by my own awesomeness as the creator of such, well, awesomeness. And may I tell you, (I'm not really asking permission here, despite how it may seem) I used only a few pieces of ribbon, a headband, some beads, feathers, lace trim, felt, a lot of hot glue, and that aforementioned set of burnt fingers to accomplish this, although admittedly said fingers were not, in fact, burnt, at the beginning of this project. I'll leave you to figure that out with your awesome (there's that word again) sleuthing skills. You will notice (or I will make sure you do)  that I did not mention the word "flowers" in that list of supplies. That is because I did not use any. While my design prominently features four, count 'em, four lovely blossoming blooms of varying colors, styles, and sizes, I did not buy even one of them ready-made. I want you to know that I actually made all of these flowers all by my little old self, and I can hardly believe they turned out at all. And because I am so absolutely insanely proud of my handiwork, this time you get a picture. Make that two pictures. But being of the cell-phone variety, the quality of them is not very good. Still, my work is thus preserved for all time, come what may. Also, I wish to assure you that it looks significantly lovelier upon my darling's precious head than it does perched on top of the unfinished wooden banister post, but the darlings are currently gainfully employed at their place of education, which is the one crucial factor that enables the crafting and subsequent blogging to occur at all.


Come, now, you must admit that this is a fairly nice piece of work, especially for this admittedly non-crafty crafter. And, well, I myself love how my kiddo looks in it, so there's that. But most of all, my (big) little girl feels like a princess in it, and that's really all that matters, isn't it? Meh, who am I kidding.
Off to call the newborn photographer.


Updated 2/2014 with a somewhat better picture, of the non-cell phone variety:


Wednesday, July 17, 2013

Pink Satin Flower Headband

Yesterday I produced something so cute I can't stop looking at it and smiling. I made a yummy little headband for my tiny niece. I made a satin flower headband, in princessly pink of course. (What? I have just as much right to make up adjectives as the next person, y'all!) I found the most gorgeous pale pink super-soft elastic with a decorative twist running down the center while browsing at the store for ribbons. I don't know what it's actually intended to be used for, but it was calling my name and demanding to encircle a precious soft little baby head, so home it went. Then I kept it lying around for a while because I just couldn't decide what would be special enough to top something so pretty. Yesterday I finally got down to it and just did it.
 I used this tutorial as the basic idea for how to construct the flowers. You cut out circles, uneven is fine, and then you use an open flame to melt the edges so they stiffen and start to curl. It seems most people use a lighter as their heat source, but I don't keep lighters around the house and always use a tealight for such purposes. It's also handy when using grosgrain ribbon for anything, to seal the cut edges so they don't fray. Now I want to point out something that wasn't clear to me from the tutorial. If you hold the circle so the outer rim is nearest to the flame, the edge will harden and maybe shrink if held long enough, but it won't really curl up into the bowl shape you are aiming for. Good for sealing edges of things you want to keep flat so they don't fray. If you want the edges to curl up, you need to hold it so that the part of the circle that is on the bottom and on the edge is nearest the flame. So figure out which side of your satin, if it's different on both sides (mine had a more shiny side), you want to have showing at the top of your flower, and hold the bottom of the fabric so it faces the heat source. I like to make use of the side of the flame as opposed to the top, because I find it easier to avoid burning myself, so I'll hold my fabric by the side of the flame, not above it. You want to have the outer edge of the BOTTOM part of the circle turned to face the flame, not the actual outer edge of the circle. So you are melting a ring shaped area on the outer edge of the bottom of your satin circle. Make sense?
 I changed it up in a few ways. I used a soft pink satin ribbon, very wide, because I didn't have any satin fabric. I used fewer layers than the picture shows, and I burnt them for a short enough amount of time so that they they didn't get quite as curled up as on the photos in the tutorial. I felt this gave it a softer, daintier look, since it's for such a tiny princess. In the center, I glued on one of the pearls I bought on my trip to Michael's. I was going to use a large one, but when I tried it out, I felt the smaller one looked better. My kids agreed, so that's the one that went on. I also didn't bother with the leaves. I wanted more of a clean, minimalist look for this. I don't know why. But I'm glad it worked out.
I cut a piece of the pretty pink elastic 3/4 inch larger than the baby's head measurement. This turned out to be 15 inches, which happens to be a typical size for most newborn headbands, as I discovered from snooping about online a bit. I sealed the cut edges by melting with my trusty tealight. Then I sewed them together with a 1/4 inch overlap. I'm hoping I made it large enough to still fit her for a little while yet as she grows. I think it will, because the elastic is so soft that it's pretty stretchy without being constricting when stretched. Come to think of it, it might be just a tiny bit loose on her for now. Oh well, if it is she'll grow into it. So I hot-glued the flower right on top of the seam, then glued a felt circle under the elastic and to the underside of the flower to sandwich the elastic between the circle and the flower. This way, it lays nice and soft and smooth against her little noggin, with no bumps or rough areas to irritate her, and none of the glue or stitching shows. Maybe one of these days if I can overcome my aversion to uploading photos I'll post a picture, because I'm just so thrilled with the way it turned out.

Monday, July 15, 2013

I Took the Plunge

I finally took the plunge and bought some fabric for upcoming sewing projects. Until now, all I used were scraps of clothing and bedding that were going to be gotten rid of otherwise. Repurposing is great, but some times you just need to pick out a brand spanking new piece of cloth. I haven't been willing to spend money on fabric when my previous sewing projects were just for learning or practice. I didn't want to risk wasting the money if the project were to turn out to be a flop. I didn't know if I was capable of producing anything usable. But now, I think I might be there. To me, this is validation that I have finally learned to operate a sewing machine capably enough to construct a brand new garment that my kids can actually wear out in public.  I decided it was now or never, and mustered up the confidence to go pick something out for me to sew.
The project I decided to attempt was a pillowcase dress for my daughter.  I figured that was simple enough for me to manage and easygoing enough that my small errors wouldn't be a catastrophe. And let's not forgot, they are so, so cute and fashionable right now.
Browsing in the fabric store was delightful.  I spent an inordinate time in the store looking at and feeling the different beautiful fabrics before making my selection. My original thought was to use a denim or chambray type of fabric, and use navy blue ribbon. Then I thought perhaps a nice floral would do. And then I spotted some pretty seersuckers, and thought I could do something with that. I finally settled on a lovely piece of grey and white seersucker with extra thin stripes, to be paired with white ribbon for the shoulder straps. Then a light bulb went off in my head: I could do the dress for my daughter and use the same fabric to whip up some matching elastic-waist shorts for my boys to wear with white polos! What a cute family portrait that would make! I plan to get started ASAP. I'll let you know how it all turns out. I'm so excited about this project and really hope I don't mess it up.

A Crafty Shopping Trip

Yesterday I spoiled myself a little bit. I made a trip to Michael's craft store to find supplies for my crafting projects. I try not to spend much money on my hobbies at all, so everything I bought was within strict limits. I love going to craft stores. I feel like I'm in a toy store for grownups. I just want to buy everything and try everything all at once. So I try to buy only stuff that can be used to make actual useful items. I'm not on the financial level to make art just for art's sake, so I'm going with things that can actually save me money on something I'd otherwise have to buy ready at the store at this point. If I buy it, it's got to serve a purpose, and I prefer if that purpose is more than just decorative. I'm not yet a skilled enough crafter that I'd want to decorate my home with stuff I've made myself, and when you're on a budget, useful ought to come before decorative. So I would buy supplies to create or embellish clothing for my children to actually wear, but not stuff like polymer clay, which I love working with, but serves no practical purpose.
So what did I actually buy? First of all I bought some elastic, as I've got some sewing projects in the works, which I'll share later on. Also, I bought a navy blue Sharpie marker. I wanted a fabric marker, truthfully, but I couldn't find a navy blue colored one that wasn't part of a larger multipack, which cost more than I was willing to spend when I just needed the one color. I needed it for two reasons, one because I have an awesome shirt embellishment project in mind to use it for, and two because I had a little bleach spatter accident involving my son's best pair of navy blue shorts and I'm hoping to use the marker to repair that damage and save the shorts. I hate hate hate bleach and try to avoid using it at all costs. The smell makes me nauseous and no matter how careful I try to be, I seem to come to grief very frequently when using it. But in this case it was unavoidable, hence the nasty byproduct.
I also bought some tiny jewelry making parts (findings) called crimps. These are little metal tubes used to seal off the ends of beaded jewelry so the beads don't fall off the wire or cord. You slip them over the wire and pinch them closed with a special tool that creates a groove down the center and then pinches the two upper edges of the groove together so it's a round tube again, with the wire pinched in the groove at the center of it. I have some beaded pieces that have fallen apart, and I'm thinking that this way I can repair them by myself rather than throw them out or have them done by a professional repair place.
I had so many other items in my shopping cart as I walked around the store, but before checking out I forced myself to give up some of my project ideas and pare down to the bare minimum. There were some things on my shopping list that I didn't end up finding, so I'll have to go somewhere else if I want to use those things. But I did buy some things I was planning NOT to buy. I was checking out the clearance aisle and there were some rolls of colorful striped ribbon on sale for $.49 a roll, so I bought two, a wider one and a narrower one. I know they'll make adorable hair accessories. Then, I found myself in the ribbon aisle. I was going to pass right through, because I have a nice stash at home now, but then I happened to notice 3/8" wide grosgrain ribbon in many colors on a 10 yard roll for $2. At my local trimming store, this kind of ribbon sells for $.85 a yard. Ribbon is something I use a lot lately, since I like kids' hair accessories to match the outfit they're wearing, and bows and such tend to be really expensive - $4 for a simple grosgrain ribbon bow, and upwards from there, at least around where I live. As mentioned previously, I'm working on learning to do ribbon sculptures, and have also done quite a few bows and flowers with ribbon. So ribbon gets used a lot, and at that price, I wasn't going to leave it there. I originally snatched four rolls, but one must have stayed behind in the shopping cart, because I didn't find it when I got home and unpacked, and the receipt shows I only paid for 3 rolls. Too bad.
I also got a little package of fake pearls in different sizes. I plan to use them as centers for fabric flowers. Ditto for a pack of rhinestones. I also got two more sheets of felt, in white and pink, for making hair accessories and other stuff. My local store sells them for $.69 a sheet, here I got them for $.33. And they are a nice heftier variety than the type I've bought before. I also threw in a roll of double-sided scotch tape, useful for so many things.
One crafty thing I've done quite a few of is woven friendship bracelets, also called macrame. These are made by knotting colored cord in different patterns to create different designs. I learned to do it last year and found it very enjoyable, and a relaxing way to kill time, especially on long car rides and other situations where I tend to get edgy. I use the method to create other things as well as bracelets. I made a wide chevron patterned one to use as a pacifier holder for my baby, for example. I also think they would make great shoulder straps for handbags, belts, shoelaces, and headbands. I'm been planning to teach my daughter to make them also. I  think maybe by now she might just be old enough. I like to use colorful six-strand cotton embroidery thread for my designs, and on my shopping trip I found a package of 34 skeins of thread in tons of colors for $3.99. I've already started a bracelet to match my daughter's new purple t-shirt. It's a plain, basic candy stripe, the first type you usually learn, but with a nice pattern I thought would look really interesting. Six strands, two dark purple, two light purple, one black, one white. I'm doing the two purple rows near each other, resulting in one wide purple band. then one black, then one wide light purple, then one white. Looks cool so far!
I also (finally!) bought some fusible adhesive. I've wanted this for a long time, and have a few uses in mind for it. My local store doesn't carry it at all. In addition, I bought a gorgeous cream-colored burlap flower clip, just because I loved it. Some people splurge on shoes, clothes, or jewelry...this was mine. For $2.99, I don't think it was unreasonable. It'll make a nice hair accessory.
I also picked up some goodies for the kids - a pack of initialed notecards with  matching envelopes for my daughter to write letters on, and some washable watercolor paints for my son. He's been desperate to paint ever since my mother-in-law sent my daughter an art kit containing watercolors. I wouldn't let him try them because I don't trust him with non-washable paints, and though he got his own present, all he has wanted was to paint like his sister. And now everyone's happy.

More Hair Clips

I made two cute little hair accessories yesterday. One was a simple black ribbon twisted into a military braid with the ends tucked in. I glued it to a plain snap clip, using a piece of rubber shelf liner for no-slip grip on the inside, of course (see previous hair accessory post for more on this). In the curves of the outer edges of the braid as well as in the center of the two ends of it, I stuck some big rhinestones. It looks nice, though I would have preferred smaller ones. But I had to use what I had. It still looks pretty in the hair, though I did not do a very neat job and had a lot of glue drips to pick off, not all of which were willing to separate from the ribbon. I colored over the stubborn ones with a black Sharpie, and that made them somewhat less obvious. Oh well, I'm not selling these or anything, so if it's not perfect, chalk it up to practice, right?


The other clip I made was a red and white candy in a wrapper. In the lollipop and candy clip tutorial I linked to in an earlier post, it instructs you to use several colors of ribbon and roll them together as a spiral. I felt I could do better. When all the ribbons are rolled together and all you see is the thin edges of them, it really takes away from the effect of the colors. So I decided to improve on this. I prefer to use just two colors for a really sharp contrast, and stack two pieces of the same colored ribbon before rolling, instead of using four colors of ribbon. So I put a white ribbon on top of another white ribbon, then a red ribbon on top of them and another red on top of those. In this way, when I roll the spiral, the stripe of each color is twice as thick and therefore shows up more. You can actually see a swirl of two colors, instead of tiny bits of color all jumbled together that look like one dull color when you don't look at it from close up. I wrapped my pretty candy in a piece of wide sheer organza ribbon just as an edible candy would be wrapped in clear cellophane. I used a piece of white thread to knot around the two ends to create the typical twisted wrapper edge, knotting the thread tightly and trimming the excess so it's invisible. A dot of hot glue made this easier. Since I was using ribbon and not fabric, I didn't need to do anything to prevent the upper and lower edges of the candy wrapper from fraying. For the two cut ends, I brushed on some clear nail polish to prevent them from unraveling, something organza does very easily. Trim the edges and hanging threads, stick on a white-covered clip, and voila! Sweet enough to eat!
I will try to remember to upload a picture of that one.

Friday, July 12, 2013

Sewing for My Boy - Stuffed Friend from a Child's Drawing

My son wanted me to sew something for him, too. He brought me a drawing of some kind of person or monster creature, and asked that I make him a doll that looked just like it. This tutorial helped make it happen. The original drawing was very small and I wanted to be able to actually trace around the picture for accuracy, so I asked my son to draw a picture as large as a sheet of copy paper. He did and I cut it out and used it as a template. He wanted it blue, so I cut the pieces out of navy blue felt. The character has lopsided eyes made from mismatched buttons, a red felt mouth, and a triangular nose made halfway of blue and white gingham fabric and halfway of red and purple print. I topstitched all around the nose and down the center dividing line between the two different fabric halves with pink thread (because that's what was loaded in the machine and I was lazy to change it) using a tight zigzag buttonhole type stitch. I know it's a buttonhole stitch only because the button on the sewing machine that produces this stitch has a drawing of a button on it, but I really know absolutely nothing about making buttonholes. I would love to learn, thought, because it seems like it would be useful if I'm actually going to be making a variety of clothing. My son did not mind the pink thread at all, he actually loves pink. None of this detail was based on my own creativity at all, as I was working from a drawing, so any lines or seams are based on what the drawing showed. But he did not color the picture, which was a good thing because then I could use whatever fabrics and colors I had available. When sewing together the front and back of the doll, I left the top of the head open to put the stuffing in. I then made several zigzag seams from contrasting red thread to both close the gap and serve as hair. I did not have any batting to stuff the little guy with, so I got creative. Remember in the previous post I told you about those bed sheets I had that had gotten very thinned and worn out over time? Well, I cut them up to little pieces and crumpled them up to use as stuffing for my son's little friend. I also add a bit of dryer lint - it's clean, so why not recycle?
The funny thing was, when my husband first saw what I'd made, he had some criticism - he wanted to know why I had made the head so lopsided, the eyes mismatched, etc. Why hadn't I straightened the details that didn't turn out nice on the drawing? I explained to him that our son wanted me to copy what he'd drawn, and that's what I'd done. But his theory was, our son is just a little kid, and obviously his drawings aren't going to be perfect, but that didn't mean he wouldn't want them to be. He drew mismatched eyes not because he wanted a doll with lopsided eyes but because that was all he could manage, and I should have understood that and done a better job than he had. But it was done, and I wasn't going to redo it.  We'd just have to see what the kid said. Well, when I showed our son the doll, the first thing he did was ask where his drawing was. I gave it back to him, and he immediately laid the doll on top of the picture to see if the shapes matched. I could see him comparing the features of both. Then he wanted to know why the doll lacked an odd random corner he'd drawn into one side! Ha! I explained to him that I'd tried, but I'm not that good at sewing and the corner turned out more like a curve after I'd sewn the two halves together. Satisfied that everything else was in perfect order, EXACTLY as he'd drawn it, he fell in love with his new friend, talking to it, and carrying it around everywhere. Score one for Mama!

Peasant Dress-style Nightgown

Continuing my adventures in sewing, I was brainstorming what to do with some old bed linens I had lying around. It was a complete set with twin sheet, pillowcase and duvet cover for two beds, and the fitted sheets were all worn out, thin and getting holey. I figured the rest of the pieces would make great free fabric to practice my sewing on, without having wasted money if anything turned out to be a total flop. It's the kind of fabric that I can't really see anyone actually wearing as clothing, as it just looks so...I don't know, "beddingy". So I thought of making sleepwear out of it. A nightgown for my daughter sounded like a great way to practice making dresses later on. I asked her about it, and she was really excited to give me her specifications for how she would like it to look. She made sure to request that I make it larger than her normal size so she could wear it next year, too. I based the style on this tutorial, of course with my own twists. I made the neck opening smaller, and made the gown long enough to brush the floor, because my little girl informed me that that would make it truly princesslike. She also requested short sleeves, and bows or roses on the sleeves and front. I obliged with little sleeves just above the elbow, with a ruffled edge. I did that by sewing a seam all around about 3/4" from the edge of the sleeve with elastic thread loaded in the bobbin, using a zigzag stitch. This is a something I learned about on the make it and love it site, where she teaches how to shirr fabrics this way. I would have never thought the machine could sew with the thicker elastic thread, if I hadn't seen it there. I decided to see if I could use it to form the sleeve ruffle, and amazingly, it worked. I then sewed on the sides of the sleeves, on top of the ruffling seams, a little pink bow made from grosgrain ribbon, and left the streamers hanging long, which delighted my daughter. On one side of the chest area, I sewed on a little fabric flower made by folding a fabric strip in half lengthwise, joining the cut edges with a long basting stitch, pulling the threads to gather the strip into a ruffle, and rolling the ruffle into a medium-tight spiral. These are things I learned to do by reading about them in various places around the web, so I can't credit any one site with them. Sometimes you learn a concept from one place, master the first step from another, but need yet a third to explain the following steps in a way that crystallizes in your brain. Know what I mean?
Another thing I did with the nighty was to cut my fabric in such a way as to use the selvage edge as the edge of both the bottom hem and the bottom of the sleeves, which eliminates the need to hem anything. That's because I hate hemming. It takes me forever and I don't really know what I'm doing and I'm horrible at it. I was lucky that my fabric, after unpicking the duvet covers, didn't have a visible selvage edge - it was just kind of sealed for 1/4" at the edge but the original print continued to the end of the selvage, if that makes sense. So all I had to do was iron the edges because the selvages were folded inward, and I had professionally finished edges all ready to go.
I must say that for me, the hardest part of the whole thing was measuring and cutting out the fabric. For some reason I always have a hard time with this part. The pieces always move around and the edges don't cut straight. And I can't seem to draw straight lines. So it took a really long time to get it all done, but I did it.
The idea to do a peasant dress as sleepwear came to me from those doll catalogs I used to obsessively pore over as a little girl. One of the dolls had a nightgown you could buy that was sewn in just such a style. It was white, or perhaps, off-white, and had a small red bow at the neck with the streamers hanging down. When I stumbled on the peasant dress tutorial online, it brought back memories of that little doll in her little nightgown in the catalog, and I thought I might just be able to make that happen.
I confess I made the nightgown a bit too long as it's even longer than floor length, but I categorically refuse to hem and my girl says she's happy it'll fit her for a longer time, so it's all good. I figure she's only going to sleep in it, as we don't walk around in our pj's all day (or even half the day) in this house, so there's little opportunity for her to trip. And if she does trip, and it bothers her, she can always put it away to grow into, right?

Tuesday, July 9, 2013

Butterfly Birthday Cake: It's the Taste that Counts!

Today I'm sharing the butterfly birthday cake I made for my daughter.

It didn't come out perfect or professional-looking, but it's my best. The main thing is that my child knows I put in the effort for her...and that it tastes good. Which this one did. And that is why I want to pass on the recipes I used...because they're THAT good. They all come from www.food.com.
I went with two thick yellow cake layers with frosting in between. The recipe for the cake is here. It is so moist and fluffy, and tastes great, too! I have used this cake recipe so many times in different ways. It's always a hit.
I just love a yellow cake with chocolate frosting. I do not care for the flavor of buttercream, not even when it's camouflaged with chocolate, and it was important that this cake be dairy-free, so that puts cream cheese frosting out of the running. I have tried so many frosting recipes over the years, and finally hit upon a winner with THIS one a few months ago. I use margarine and non-dairy whip topping in place of the butter and heavy whipping cream, and omg is it ever fabulous. Everyone person I've ever served it to has raved about how awesome it tastes. My husband will eat it by the bowlful. He spreads some on a slice of bread or just eats it with a spoon straight outta the container. I have frozen and thawed it and it was great. Using it to glue together my cake layers and frost the outside of the cake to look like dirt was obviously a no-brainer.
The butterfly and flowers are made out of homemade marshmallow fondant. I freehanded them on paper and cut out to use as a template for cutting out the fondant. Here is the recipe I used. I'm no fan of fondant myself, but other people do like the taste of this one more than the store-bought kind.
I'm not sure why the fondant appears wet and shiny in the photo. To be honest, I'm posting this quite some time after the actual event, so I don't remember if it sweated or got wet or whatever. I don't remember this fondant being shiny like that from other times I've made it.
So, there you have it. That's my best. Now go ahead and outshine me...

Tuesday, July 2, 2013

Blue Car Birthday Cake and Confetti Cupcakes

My little boy turned five years old! For months now he has been telling us that he wanted a blue car cake for his birthday, so that's exactly what he got. The cake was decorated with buttercream tinted blue with food coloring, yellow and white mini m&ms, oreo cookies, bittersweet baking chocolate, and green and black piping gel.
For the inside of the car cake, I tried a new recipe I found in a cookbook I have for a chocolate chip cake made from scratch, since my son loves chocolate, but I wasn't thrilled with the taste or texture, so I'm not going to share the recipe. I baked the cake in two round pyrex bowls, one larger and one smaller, to get the right shape. Two baking tricks - I always reduce the sugar in cakes somewhat, and it's usually fine. For a cake that's going to be covered in sweet frosting, it can easily be reduced as much as 1/3 to 1/2 with no ill effects. Also, when baking with margarine, as I did for this cake, I use the empty wrappers to grease the pan or bowl with. It works great. So when the cakes were baked, I let them cool, then flipped them over to have two domes. They popped out easily due to the margarine wrapper trick. I smeared melted chocolate over the smaller dome and stuck it on top of the larger one, right in the center. Then I cut a straight slice off each of the two sides of the cake, giving me two parallel straight edges that formed the car silhouette.
For the buttercream, I always use this recipe from food.com - if you look at the photos of the recipe, the rubber duckie cake was made by me for my little guy's second birthday three years ago. I didn't mess with fancy tips this time - I just spread the cream on with an offset spatula.
To make the windows and windshields, I drew and cut the shapes out of paper, and laid them on the counter with a sheet of wax paper on top of them. I melted the chocolate in the microwave, added a little bit of oil to smooth it out and add flexibility, and spooned the mixture onto the wax paper in the approximate shapes of the paper cutouts. When they were almost dry, I trimmed them with a pointy knife to get the right shape, then peeled them off the wax paper and stuck them into position. The wheels were oreo cookies with a white mini m&m glued on with melted chocolate for the hubcap. For the bumpers, I spooned white buttercream into a disposable plastic bag, snipped the tip, and piped it on.  The yellow m&ms served as lights. The piping gels were used to outline the details and draw a number five and my son's name on the top of the car. Five blue and green candles went on top, and he was a happy boy at his birthday party. I have done more elaborate themed parties before, but not this time. We had a celebratory barbecue dinner, then cake, singing, and presents.
The next day, we sent cupcakes to school for him to hand out to his friends. I used this easy recipe I cut out of a local publication a while ago, rewritten using the same ingredients and amounts but organized and explained in my own way for clarity:

BASIC YELLOW VANILLA CUPCAKES

Preheat oven to 350 degrees.

BEAT:
1 cup sugar
1/2 cup oil

ADD ONE AT A TIME:
2 eggs

COMBINE:
1 teaspoon vanilla
1/2 cup apple or orange juice

SEPARATELY COMBINE:
1 1/2 teaspoons baking powder
1 1/2 cups flour

Add flour mixture alternately with juice mixture. Mix until smooth. Bake 20 minutes or until tops are brown. Yield: 18 cupcakes

I doubled this recipe and it worked just fine, though some recipes don't double well.  I used the orange juice option because I rarely buy apple juice and they were quite good, though the orange juice flavor was definitely noticeable. I'd like to try with apple juice for comparison. Milk would probably work great, too, but I had to make them dairy-free to send to school. To make them confetti cupcakes, I tossed some colored sprinkles into the batter before putting it in the pans.  It's important to use the long "line" shape sprinkles for this, not the ones that look like tiny dots. Stir gently, and bake as usual. We used cute clown-printed cupcake liners to make them even more festive. We dipped the cooled cupcakes in melted chocolate, then in colored sprinkles. Finally, we piped a red number 5 on each one using melted red candy melts piped out of a tiny hole snipped in the corner of a plastic bag. My son was beaming and he's overall thrilled with how his birthday turned out, so score!

Tulle Flower Clip

I've got a tiny new niece. And I just can't resist her. I love all things tiny, but especially and immensely tiny human beings. And this one has a full head of wavy black hair that just begs for flowers and bows and all things girly.  And twirly. And curly. And so, I just had to make her a pretty little hair thingie. I happened to have a bunch of pink tulle scraps left over from another project, and they became a little clip for the little princess. And here it is.


I'd like to assure you that my niece is, in fact, real, and this doll is not actually her. But I needed a model and this one was closest. Just focus on the flower, 'kay?
I think it looks kind of like a little tutu. Girly and fun!
I can't really explain how I did it because I was experimenting with this one and ended up repeatedly readjusting the method as I went on, to see what look I'd end up getting. But I can tell you it's made from an awful lot of pieces of tulle, in all different shapes and sizes, all glued and scrunched and folded in a variety of styles, based on the many different types of  flowers I've seen in online tutorials. In the center on top of it all I twisted a strip of tulle into a rope and then rolled it into a spiral and stuck it on top of the flower, which helped it flatten and spread out. I also trimmed the edges to make them more uniform after it was all done. I added a rhinestone to the top and some narrow satin ribbon streamers to the bottom to really glam it up, and then backed the whole thing with a felt circle. I glued on a tiny snap clip, then another felt circle on top of that with a tiny slit cut into it for the bottom half of the clip to poke out of, to give it extra staying power. And then I held it at arm's length and smiled because cute little things for cute little people make me happy.

Getting Into Ribbon Sculpture

I recently decided I wanted to try making those adorable ribbon sculpture hair clips you see being sold in lots of places these days. So I've been looking for info on how to make them and finally bought a few pieces of ribbon so I can experiment. I came across a this tutorial for a ribbon goldfish that was for sale on etsy.com, and it looked simple enough for me to figure out on my own. Because I will not spend money on a tutorial! I'll figure it out, or do without...or find a free tutorial elsewhere online! Anyway, working from just that picture, I decided to make a little blue ribbon fish to match a t-shirt with a blue fish on it, and thought I could also improve on that fish-eye look. I used a narrower ribbon than the picture shows because that's what I had, but I think it turned out just fine anyway. And this time, I have a picture to share.


I used 4 pieces of light blue 3/8" wide grosgrain ribbon, one for the body, one for the little piece that scrunches the body to form the tail, and two for the fins. Sorry, no measurements, I tend to just eyeball it. The colors are kind of altered in the photo, but the background ribbon that the actual alligator clip is covered with is a pale aqua with white polka dots, reminiscent of the sea but with an added fun factor. Because I found polka-dot ribbon at the store and I simply adore polka dots. So Fishy swims in the Polka-Dot Sea, basically. The eye is just a tiny little googly eye sold for crafts, made more fishy by using a dot of blue puffy paint to stick it on instead of glue. 
For this clip, I tried out the idea for no-slip grip I saw here (she is just so incredibly creative and talented).[..and liked it so much, I went back and added it to the other clips I'd made previously. 
I plan on using this on all of my clips I make from now on. One roll should last pretty much forever. 
So this is my first attempt at ribbon sculpture. I'm now hooked and I have loads more ideas floating around my brain waiting to be translated into ribbon. The hardest part is decided which one to do first!

Tuesday, June 11, 2013

Wafer Train

My 4-year-old had an event at school for which he needed to bring something for the whole class. I created an edible choo-choo-train with a car for each student and teacher. I used large chocolate coated wafers, colored m&ms, shoestring licorice, cream-filled sandwich cookies, candy corn, colored candy melts, and melted baking chocolate. I cut the wafers in half crosswise and sandwiched the two halves together with licorice in between using melted chocolate as glue. I made a string of cars this way, all attached with licorice strings, making sure to keep the seams between licorice strings hidden inside the cars. Each one got 4 m$m's of the same color for wheels. Perched on top in a standing position were white letters for the kids' initials made by pouring melted white candy melts in a plastic alphabet mold. The locomotive was made using additional cut wafers stuck at right angles with an extra little piece stuck on horizontally at the top of the vertical wafer half. The barrel was a stack of cream-filled sandwich cookies glued together with melted chocolate and laid horizontally on the horizontal base wafer.  Two pieces of candy corn made a perfect smokestack. For the wheels, I used one red candy melting disc and two red m&ms. I stuck them on the locomotive, then dipped a small piece of licorice in melted red candy coating and stuck that horizontally across all the wheels at a slight angle. The children went absolutely wild over the train. It wasn't very elaborate or difficult to make, just very time-consuming due to the large number of cars I had to make - there are 32 children in the class.That was one loooooooooong train!.

Cute Baby Cake Pops

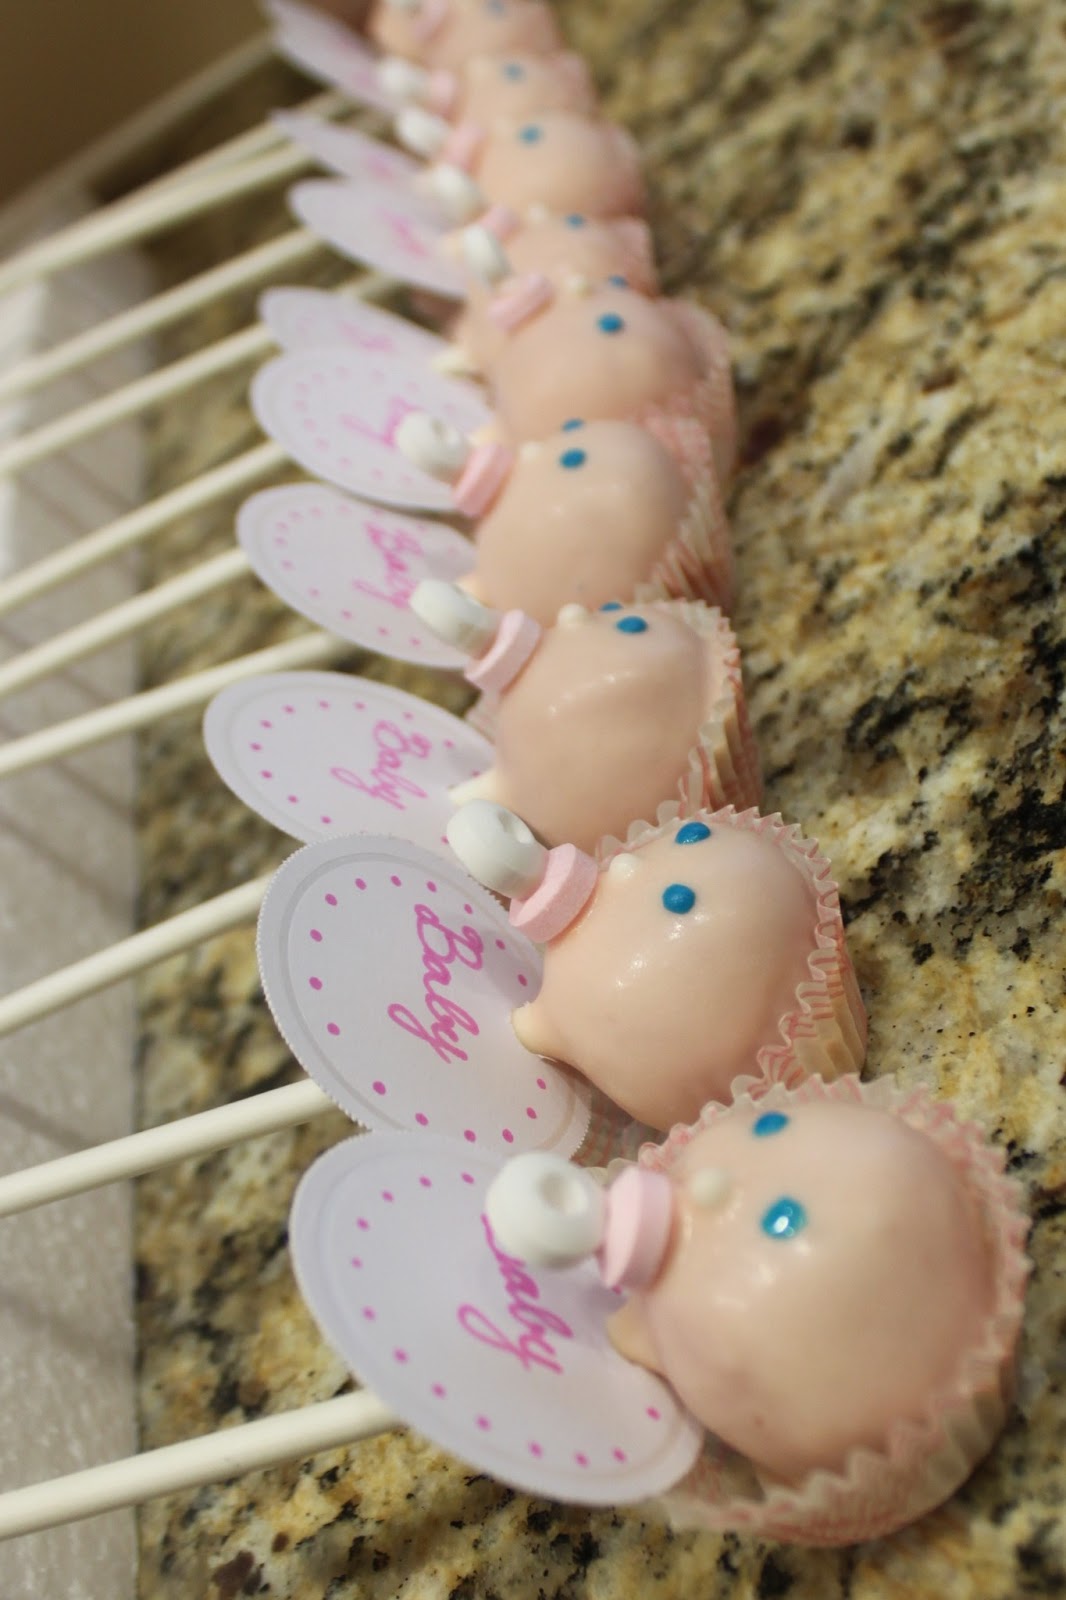
Today I completed some adorable little girl baby cake pops. And believe it or not, this time I'm actually sharing a photo, so you really get an idea of how they turned out! This is actually during the construction process, while they were drying, not the final presentation how they were displayed with the base and all. But aren't they cute?!?

I made them for a "Welcome New Baby" party, although it would be amazing for a baby shower as well. The inspiration that sparked this project's design was assembled and reinvented from a variety of different places across the web. It was a three day process.  On the first day, I baked a Pink Velvet Cake from scratch based on this cupcake recipe from Taste of Home. I baked it in a 9"x13" pan, and increased the bake time by about 15 minutes. Instead of the vanilla extract called for in the recipe, though, I used strawberry extract, and increased the amount just a touch. I couldn't find any pink food coloring after checking 3 stores, so I just used red and added it drop by drop to make sure it didn't get too dark. I'm sure the color would have been prettier with the pink, though. I can't vouch for the texture of the cake since I made a mistake and only added 1/2 a cup of butter instead of 1 cup, and it was kind of heavy and a little bit doughy, yet dry. Hard to describe, but almost certainly my fault. The flavor was kind of bland, rather pound-cakey, I would say. I assume it would be even blander with plain vanilla extract as the original recipe directs, though you never know - after all, mine WAS missing half its butter. I was glad the cake was destined to become cake pops, as I figure the crumbling and mixing with frosting would render both taste and texture issues irrelevant. I didn't use the frosting given in the recipe. I wanted something that tasted awesome, since the frosting gets mixed with the cake and is therefore an integral part of the flavor. For that, there's only one way to go: cream cheese frosting, doctored up with strawberries. I used this recipe for the frosting only, not the cake part of the recipe. I used only 2 cups of the confectioners' sugar, since I was more concerned with taste than texture, and wanted the cheese and berry flavors to really shine through. It tasted pretty good, though it was kind of runny, so if you wanted to spread it between cake layers you'd probably have to thicken it with more sugar as the recipe states, or else it will run out the sides. But I'd be afraid that might make it overly sweet and less flavorful.
Anyway! Moving on. I crumbled the cake up and mashed it with just enough frosting to make it moldable. It didn't take much. I did it all in a closed Ziploc bag, so there was no mess from this part. When it was perfectly smooth, I shaped little balls using my cookie scoop. I dipped the tips of lollipop sticks (say that three times fast ;D) in a bit of melted white baking chocolate to help them stick, and stuck on in each ball. Obviously. Hence the name cake pops. But yeah, the melted chocolate makes it nice and secure when it dries.so the ball (hopefully) won't slide off the stick when you're dipping it.
To decorate, I started by mixing white and orange candy melts plus a tiny bit of red to get a rosy flesh tone. I   prefer my cake pops to have to coats for better coverage. So I first prepared an overturned cardboard box with little slits cut into it to stand the pops in while drying so the heads stay nice and round. I dipped, shook off the excess, and applied a little edible pearl in the center of each face to make little baby noses. I held and rotated each pop till no longer drippy, then stood them all in their slits in the box to dry overnight. Note: do NOT leave coated pops in the freezer to harden. Condensation will form on them, making them impossible to do anything else with, as the moisture will cause the candy melts to seize up. I wasted a lot of time tenderly drying each one with paper towels before continuing the process. So leave out at room temperature! The coating and frosting will keep the cake from drying out.
Today I spent several hours finally finishing the pops. I dipped each head in another layer of candy coating, then I stuck on little pacifiers made with candy beads from a candy necklace. I cut apart several candy necklaces to get enough pink and white candies for each paci. I used melted candy coating to stick a white candy ring in the center of a pink one, perpendicular to the pink, to form the pink base and white handle of a binky. I got the idea from Bakerella, the original cake pop queen, though I didn't bother with the mouths and rosy cheeks she made. Then I laid each baby sideways into a pink and white mini cupcake liner, which stuck to the coating as it hardened and became the baby's ruffled bonnet! I leaned the ends of the sticks on a piece of styrofoam while drying so they'd be lightly elevated, helping the bonnets stick on the heads at a good angle. The cupcake liner bonnet idea came from Veronika in the "Pop Stars" section of the Bakerella site. When dry, I piped on eyes using store bought blue writing icing that comes in a tube. Then I wanted to add bibs, as Bakerella does, but I don't currently have a functional printer. I wracked my brains awhile, then went out and poked around the stationery store a bit. I found round white heavy paper tags with little holes to attach a string or whatever. I bought a pink Sharpie permanent marker and wrote Baby in cursive letters on the center of the circles, then added a border of little pink dots all around. I needed to enlarge the holes with a manual hole puncher to get them to fit over the sticks, but when I slipped the bibs on my little babies, the effect was just precious. I covered a styrofoam block in pink crepe paper to use as a base. I crisscrossed pink folded tulle strips all over it in both directions and knotted them all along the 4 sides of the block, leaving a little tail to create poofy tutu-like effect. Then I added 3 narrow satin ribbon bows at the front with trailing tails as a finishing touch. I used the pointed end of a wooden skewer to poke holes to insert the pops without tearing the paper covering. I stood those babies on the base in 6 rows of 4 babies. Cutest thing ever!

Thursday, June 6, 2013

Felt Hair Accessories

Lately I've discovered the joys of working with felt. It doesn't fray and you don't need to finish any edges. Plus, its weight gives it enough stiffness to make things that wouldn't work with flimsier fabrics. I've been getting inspiration from all over the web and finally decided to try making some felt hair accessories. I'm thrilled with the way they turned out. I mentioned the adorable red double box fold flower hair clip previously. I've been checking out ribbon sculpture tutorials lately and plan to try making all kinds of adorable designs, but first I need to get a good stock of ribbon to work with, so that should be coming up in the coming weeks. But for this felt clip, I used an idea I saw for making a lollipop ribbon sculpture, and made it out of green and navy blue felt strips I cut out myself. I like the chunkiness of it, and I used a filmy gauzy type of white fabric (as opposed to the tulle used in the tutorial) to make a wrapper for my sucker. I brushed clear nail polish on the edges of this fabric to keep it from fraying, though I have read of a product called Fray Chek that is meant for just such a purpose. But nail polish is what I had around the house so that's what  I used.  I wrapped a trimmed toothpick in a white felt strip for the stick. Then I glued the lollipop to an alligator clip I had covered with more of the green felt. I love that the felt turned the simple design into something that was a big and showy accessory that really catches your attention without being the ubiquitous enormous flower or bow on a little one's head. Sweet enough to eat!  I plan on doing the wrapped candy design in the video also at some point.
Another clip I made was loosely based off of this tutorial for felt clips from Make it and Love it, one of my favorite crafty sites that I check out often. A lot of her projects are way out of my league, but she has a knack for writing awesome clear easy-to-follow tutorials and really helps you understand what to do. I loved the little birdie design, so I used a plain little snap clip and then did what I do best: I personalized the little birdie theme. I made my clip in navy blue felt, and made the bird outline out of red felt. Full disclosure: I was actually trying to do something else which didn't turn out good at all and serendipitously found this little bird-shaped scrap left on the table from that attempt. I skipped the wing and feet detail - too complicated for me - and used a sharpie marker to add a little eye and beak. Cutest of all, in my opinion, I covered just the top of a large white button with a little circle of navy and white windowpane checked fabric, using my trusty glue gun of course. It developed a little frayed edge that I decided I love, and the glue underneath keeps it from fraying any further. Then I glued the button to the center of the clip as opposed to the edge like in the tutorial, and stuck Birdie on top of that. I originally wanted to sew the seams around the edge to finish it like Ashley did, but in the end it was too difficult, especially sewing through all of that glue, so I skipped that part. I love the way the clippie looks. I'm cooking tons of ideas for other things to do with felt.
Update: Guess what? I ended up uploading some pics of some of the clips I had made to share with a relative via email, so now that I have 'em on the computer, you get to see them too! Sorry for the lousy photography skills, it's another thing I have to learn!

Aren't they cute?

Sunday, June 2, 2013

First Post Ever!

I like to make things. Who doesn't? But I don't have all that much experience crafting, and a few weeks ago I had no idea how to use a sewing machine at all. (I took a sewing class as a teenager, but never picked it up at all...and quit after I broke several of the sewing machines. True story.) I do cook and bake a lot, but I'm always interested in learning new techniques, especially in the area of desserts and cake decorating. I have had the urge to create for some time now, and have been trolling the internet obsessively for stuff I can learn to do without much knowledge or experience. I have also always loved writing, and I feel like I've been getting rusty lately for lack of practice, so I've decided to collect my ideas here for homemade projects I've heard/read about that I would like to try. Kind of like a Pinterest board, only with more words. I plan to document future plans as well as reports of stuff I've done and how they turned out.
Two months ago, I got my husband to teach me the basics of machine sewing (he can figure out any kind of machine without being taught, lol) and will be trying out different easy projects on my 40-year-old Pfaff machine inherited from my mom, who no longer has the eyesight or patience to sew. I have been saving fabric items such as clothing and bed linens that are headed for the garbage can and using the scraps to experiment. I sewed several little doll clothing items for my daughter's babies, with mixed results, and learned from my mistakes. I will keep looking out for stuff I can construct with minimal ability, and hope to eventually create something wearable for my children.
My most successful craft project to date has been a lovely felt flower hair clip I made for my daughter, based on a tutorial I found over at iCandyhandmade. I made two of the flowers out of red felt and used hot glue to hold the pieces together and attach them to a clip side by side, and used some yellow thread to stitch a somewhat sloppy little dot in the centers of the flowers. The tutorial actually calls for stitching the petals together and sewing a button to the center, but my hand sewing skills being what they are (a.k.a. virtually nonexistent) I ended up not catching all of the layers in my stitches and not managing to sew it well enough for the ones I did sew through to hold properly, hence the glue. It looks great, if I say so myself!
As an aside, I prefer to use hot glue rather than the fabric glue called for in most fabric projects that aren't sewn, because I think it holds better and, more importantly, dries a lot quicker. I'm not one to wait around until the glue dries. So a $2.99 mini glue gun it is. I caused a minor explosion that busted one recently and was super glad it wasn't much of an investment to replace. Cheap and cheerful, that's how we roll around here.
I'm the lucky mom to three lovely and lively kiddos and I'm thrilled to be able to live my longtime dream of staying at home with them. Lately, though, I've been feeling a bit more of a need for a creative outlet other than cooking their meals and putting together Lego projects with my boys. I used to get my creative fix by shopping around and concocting adorable outfits for my babies, but it's become rather hard on my budget to assemble exactly the right shoes and accessories I envision to pull an outfit together, hence my new-found interest in crafting.
What I hope to do here is compile ideas for things that a beginner can pull together easily with limited time and limited materials. I don't have a lot of time to do stuff without my one-year-old getting into it, nor do I have patience with projects that have too many steps or too much waiting time. I prefer to do things I can start and finish in one session rather than those I have to work on in shifts, though I may occasionally share a more involved project, provided the steps are simple enough for the inexperienced.
My crafting budget at the moment is microscopic to invisible, so my projects will probably be limited to things I can make using recycled materials from around the house or that I can buy very cheaply, like that glue gun referenced above. I don't really do thrift stores due to an entirely unreasonable, admittedly ridiculous, yet insurmountable aversion to stuff other people have worn or used. Instead, I try to save anything I can avoid throwing away that I think I can make something cooler out of with a minimum of fuss and mess.
I much prefer to make stuff that is useful or at least wearable, rather than purely decorative. All the better if it's both! I haven't yet had the confidence to give anything I've made as a gift, but maybe one day as I get more into this crafting thing, I will. It's a goal, I guess. I also plan on sharing recipes and cooking techniques that sound interesting to me, as well as projects that can be done with or for kids of different ages.
In both crafting and cooking, my style tends toward the semi-creative. What I mean by this is that I rarely follow someone else's instructions or recipe exactly. I take the idea or technique, and change something up with a creative twist to make it my own. Case in point, that red felt flower hair clip. I used her method for assembling the flower, but made it suit me better by using glue, combining two flowers side by side, hand-stitching the centers instead of sewing on buttons, skipping the leaf, and using them on a hair clip for an older child as opposed to a baby headband. I will give credit where it's due when applicable by sharing where I got my inspiration, and comment on how I would do it or how it worked out for me if I've tried it. I hate uploading pictures, so I can't say how many, if any, of my posts will include pictures. I have no idea if anyone will ever see this blog, so right now I am just looking at it as a holding pen for my ideas. But if you're out there, and you happen to be reading this, please say hi - and share your comments and ideas!