Tuesday, June 11, 2013
Wafer Train
My 4-year-old had an event at school for which he needed to bring something for the whole class. I created an edible choo-choo-train with a car for each student and teacher. I used large chocolate coated wafers, colored m&ms, shoestring licorice, cream-filled sandwich cookies, candy corn, colored candy melts, and melted baking chocolate. I cut the wafers in half crosswise and sandwiched the two halves together with licorice in between using melted chocolate as glue. I made a string of cars this way, all attached with licorice strings, making sure to keep the seams between licorice strings hidden inside the cars. Each one got 4 m$m's of the same color for wheels. Perched on top in a standing position were white letters for the kids' initials made by pouring melted white candy melts in a plastic alphabet mold. The locomotive was made using additional cut wafers stuck at right angles with an extra little piece stuck on horizontally at the top of the vertical wafer half. The barrel was a stack of cream-filled sandwich cookies glued together with melted chocolate and laid horizontally on the horizontal base wafer. Two pieces of candy corn made a perfect smokestack. For the wheels, I used one red candy melting disc and two red m&ms. I stuck them on the locomotive, then dipped a small piece of licorice in melted red candy coating and stuck that horizontally across all the wheels at a slight angle. The children went absolutely wild over the train. It wasn't very elaborate or difficult to make, just very time-consuming due to the large number of cars I had to make - there are 32 children in the class.That was one loooooooooong train!.
Cute Baby Cake Pops
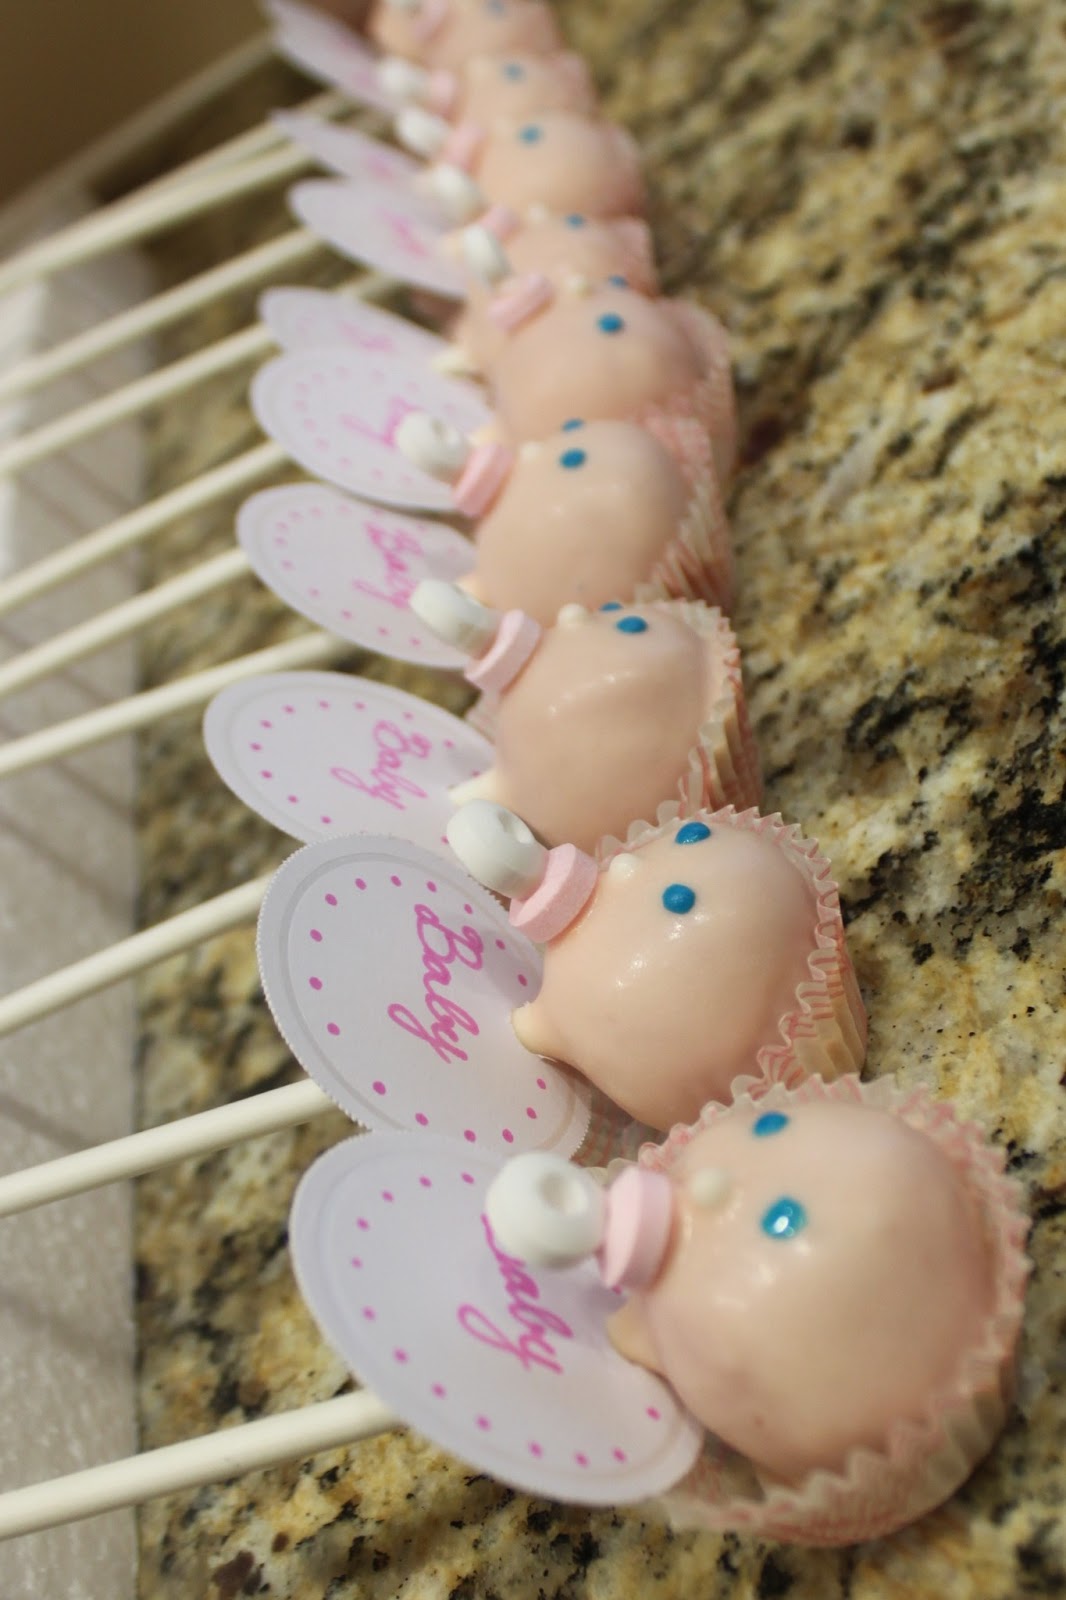
Today I completed some adorable little girl baby cake pops. And believe it or not, this time I'm actually sharing a photo, so you really get an idea of how they turned out! This is actually during the construction process, while they were drying, not the final presentation how they were displayed with the base and all. But aren't they cute?!?
I made them for a "Welcome New Baby" party, although it would be amazing for a baby shower as well. The inspiration that sparked this project's design was assembled and reinvented from a variety of different places across the web. It was a three day process. On the first day, I baked a Pink Velvet Cake from scratch based on this cupcake recipe from Taste of Home. I baked it in a 9"x13" pan, and increased the bake time by about 15 minutes. Instead of the vanilla extract called for in the recipe, though, I used strawberry extract, and increased the amount just a touch. I couldn't find any pink food coloring after checking 3 stores, so I just used red and added it drop by drop to make sure it didn't get too dark. I'm sure the color would have been prettier with the pink, though. I can't vouch for the texture of the cake since I made a mistake and only added 1/2 a cup of butter instead of 1 cup, and it was kind of heavy and a little bit doughy, yet dry. Hard to describe, but almost certainly my fault. The flavor was kind of bland, rather pound-cakey, I would say. I assume it would be even blander with plain vanilla extract as the original recipe directs, though you never know - after all, mine WAS missing half its butter. I was glad the cake was destined to become cake pops, as I figure the crumbling and mixing with frosting would render both taste and texture issues irrelevant. I didn't use the frosting given in the recipe. I wanted something that tasted awesome, since the frosting gets mixed with the cake and is therefore an integral part of the flavor. For that, there's only one way to go: cream cheese frosting, doctored up with strawberries. I used this recipe for the frosting only, not the cake part of the recipe. I used only 2 cups of the confectioners' sugar, since I was more concerned with taste than texture, and wanted the cheese and berry flavors to really shine through. It tasted pretty good, though it was kind of runny, so if you wanted to spread it between cake layers you'd probably have to thicken it with more sugar as the recipe states, or else it will run out the sides. But I'd be afraid that might make it overly sweet and less flavorful.
I made them for a "Welcome New Baby" party, although it would be amazing for a baby shower as well. The inspiration that sparked this project's design was assembled and reinvented from a variety of different places across the web. It was a three day process. On the first day, I baked a Pink Velvet Cake from scratch based on this cupcake recipe from Taste of Home. I baked it in a 9"x13" pan, and increased the bake time by about 15 minutes. Instead of the vanilla extract called for in the recipe, though, I used strawberry extract, and increased the amount just a touch. I couldn't find any pink food coloring after checking 3 stores, so I just used red and added it drop by drop to make sure it didn't get too dark. I'm sure the color would have been prettier with the pink, though. I can't vouch for the texture of the cake since I made a mistake and only added 1/2 a cup of butter instead of 1 cup, and it was kind of heavy and a little bit doughy, yet dry. Hard to describe, but almost certainly my fault. The flavor was kind of bland, rather pound-cakey, I would say. I assume it would be even blander with plain vanilla extract as the original recipe directs, though you never know - after all, mine WAS missing half its butter. I was glad the cake was destined to become cake pops, as I figure the crumbling and mixing with frosting would render both taste and texture issues irrelevant. I didn't use the frosting given in the recipe. I wanted something that tasted awesome, since the frosting gets mixed with the cake and is therefore an integral part of the flavor. For that, there's only one way to go: cream cheese frosting, doctored up with strawberries. I used this recipe for the frosting only, not the cake part of the recipe. I used only 2 cups of the confectioners' sugar, since I was more concerned with taste than texture, and wanted the cheese and berry flavors to really shine through. It tasted pretty good, though it was kind of runny, so if you wanted to spread it between cake layers you'd probably have to thicken it with more sugar as the recipe states, or else it will run out the sides. But I'd be afraid that might make it overly sweet and less flavorful.
Anyway! Moving on. I crumbled the cake up and mashed it with just enough frosting to make it moldable. It didn't take much. I did it all in a closed Ziploc bag, so there was no mess from this part. When it was perfectly smooth, I shaped little balls using my cookie scoop. I dipped the tips of lollipop sticks (say that three times fast ;D) in a bit of melted white baking chocolate to help them stick, and stuck on in each ball. Obviously. Hence the name cake pops. But yeah, the melted chocolate makes it nice and secure when it dries.so the ball (hopefully) won't slide off the stick when you're dipping it.
To decorate, I started by mixing white and orange candy melts plus a tiny bit of red to get a rosy flesh tone. I prefer my cake pops to have to coats for better coverage. So I first prepared an overturned cardboard box with little slits cut into it to stand the pops in while drying so the heads stay nice and round. I dipped, shook off the excess, and applied a little edible pearl in the center of each face to make little baby noses. I held and rotated each pop till no longer drippy, then stood them all in their slits in the box to dry overnight. Note: do NOT leave coated pops in the freezer to harden. Condensation will form on them, making them impossible to do anything else with, as the moisture will cause the candy melts to seize up. I wasted a lot of time tenderly drying each one with paper towels before continuing the process. So leave out at room temperature! The coating and frosting will keep the cake from drying out.
Today I spent several hours finally finishing the pops. I dipped each head in another layer of candy coating, then I stuck on little pacifiers made with candy beads from a candy necklace. I cut apart several candy necklaces to get enough pink and white candies for each paci. I used melted candy coating to stick a white candy ring in the center of a pink one, perpendicular to the pink, to form the pink base and white handle of a binky. I got the idea from Bakerella, the original cake pop queen, though I didn't bother with the mouths and rosy cheeks she made. Then I laid each baby sideways into a pink and white mini cupcake liner, which stuck to the coating as it hardened and became the baby's ruffled bonnet! I leaned the ends of the sticks on a piece of styrofoam while drying so they'd be lightly elevated, helping the bonnets stick on the heads at a good angle. The cupcake liner bonnet idea came from Veronika in the "Pop Stars" section of the Bakerella site. When dry, I piped on eyes using store bought blue writing icing that comes in a tube. Then I wanted to add bibs, as Bakerella does, but I don't currently have a functional printer. I wracked my brains awhile, then went out and poked around the stationery store a bit. I found round white heavy paper tags with little holes to attach a string or whatever. I bought a pink Sharpie permanent marker and wrote Baby in cursive letters on the center of the circles, then added a border of little pink dots all around. I needed to enlarge the holes with a manual hole puncher to get them to fit over the sticks, but when I slipped the bibs on my little babies, the effect was just precious. I covered a styrofoam block in pink crepe paper to use as a base. I crisscrossed pink folded tulle strips all over it in both directions and knotted them all along the 4 sides of the block, leaving a little tail to create poofy tutu-like effect. Then I added 3 narrow satin ribbon bows at the front with trailing tails as a finishing touch. I used the pointed end of a wooden skewer to poke holes to insert the pops without tearing the paper covering. I stood those babies on the base in 6 rows of 4 babies. Cutest thing ever!
Thursday, June 6, 2013
Felt Hair Accessories
Lately I've discovered the joys of working with felt. It doesn't fray and you don't need to finish any edges. Plus, its weight gives it enough stiffness to make things that wouldn't work with flimsier fabrics. I've been getting inspiration from all over the web and finally decided to try making some felt hair accessories. I'm thrilled with the way they turned out. I mentioned the adorable red double box fold flower hair clip previously. I've been checking out ribbon sculpture tutorials lately and plan to try making all kinds of adorable designs, but first I need to get a good stock of ribbon to work with, so that should be coming up in the coming weeks. But for this felt clip, I used an idea I saw for making a lollipop ribbon sculpture, and made it out of green and navy blue felt strips I cut out myself. I like the chunkiness of it, and I used a filmy gauzy type of white fabric (as opposed to the tulle used in the tutorial) to make a wrapper for my sucker. I brushed clear nail polish on the edges of this fabric to keep it from fraying, though I have read of a product called Fray Chek that is meant for just such a purpose. But nail polish is what I had around the house so that's what I used. I wrapped a trimmed toothpick in a white felt strip for the stick. Then I glued the lollipop to an alligator clip I had covered with more of the green felt. I love that the felt turned the simple design into something that was a big and showy accessory that really catches your attention without being the ubiquitous enormous flower or bow on a little one's head. Sweet enough to eat! I plan on doing the wrapped candy design in the video also at some point.
Another clip I made was loosely based off of this tutorial for felt clips from Make it and Love it, one of my favorite crafty sites that I check out often. A lot of her projects are way out of my league, but she has a knack for writing awesome clear easy-to-follow tutorials and really helps you understand what to do. I loved the little birdie design, so I used a plain little snap clip and then did what I do best: I personalized the little birdie theme. I made my clip in navy blue felt, and made the bird outline out of red felt. Full disclosure: I was actually trying to do something else which didn't turn out good at all and serendipitously found this little bird-shaped scrap left on the table from that attempt. I skipped the wing and feet detail - too complicated for me - and used a sharpie marker to add a little eye and beak. Cutest of all, in my opinion, I covered just the top of a large white button with a little circle of navy and white windowpane checked fabric, using my trusty glue gun of course. It developed a little frayed edge that I decided I love, and the glue underneath keeps it from fraying any further. Then I glued the button to the center of the clip as opposed to the edge like in the tutorial, and stuck Birdie on top of that. I originally wanted to sew the seams around the edge to finish it like Ashley did, but in the end it was too difficult, especially sewing through all of that glue, so I skipped that part. I love the way the clippie looks. I'm cooking tons of ideas for other things to do with felt.
Update: Guess what? I ended up uploading some pics of some of the clips I had made to share with a relative via email, so now that I have 'em on the computer, you get to see them too! Sorry for the lousy photography skills, it's another thing I have to learn!


Aren't they cute?
Sunday, June 2, 2013
First Post Ever!
I like to make things. Who doesn't? But I don't have all that much experience crafting, and a few weeks ago I had no idea how to use a sewing machine at all. (I took a sewing class as a teenager, but never picked it up at all...and quit after I broke several of the sewing machines. True story.) I do cook and bake a lot, but I'm always interested in learning new techniques, especially in the area of desserts and cake decorating. I have had the urge to create for some time now, and have been trolling the internet obsessively for stuff I can learn to do without much knowledge or experience. I have also always loved writing, and I feel like I've been getting rusty lately for lack of practice, so I've decided to collect my ideas here for homemade projects I've heard/read about that I would like to try. Kind of like a Pinterest board, only with more words. I plan to document future plans as well as reports of stuff I've done and how they turned out.
Two months ago, I got my husband to teach me the basics of machine sewing (he can figure out any kind of machine without being taught, lol) and will be trying out different easy projects on my 40-year-old Pfaff machine inherited from my mom, who no longer has the eyesight or patience to sew. I have been saving fabric items such as clothing and bed linens that are headed for the garbage can and using the scraps to experiment. I sewed several little doll clothing items for my daughter's babies, with mixed results, and learned from my mistakes. I will keep looking out for stuff I can construct with minimal ability, and hope to eventually create something wearable for my children.
My most successful craft project to date has been a lovely felt flower hair clip I made for my daughter, based on a tutorial I found over at iCandyhandmade. I made two of the flowers out of red felt and used hot glue to hold the pieces together and attach them to a clip side by side, and used some yellow thread to stitch a somewhat sloppy little dot in the centers of the flowers. The tutorial actually calls for stitching the petals together and sewing a button to the center, but my hand sewing skills being what they are (a.k.a. virtually nonexistent) I ended up not catching all of the layers in my stitches and not managing to sew it well enough for the ones I did sew through to hold properly, hence the glue. It looks great, if I say so myself!
As an aside, I prefer to use hot glue rather than the fabric glue called for in most fabric projects that aren't sewn, because I think it holds better and, more importantly, dries a lot quicker. I'm not one to wait around until the glue dries. So a $2.99 mini glue gun it is. I caused a minor explosion that busted one recently and was super glad it wasn't much of an investment to replace. Cheap and cheerful, that's how we roll around here.
I'm the lucky mom to three lovely and lively kiddos and I'm thrilled to be able to live my longtime dream of staying at home with them. Lately, though, I've been feeling a bit more of a need for a creative outlet other than cooking their meals and putting together Lego projects with my boys. I used to get my creative fix by shopping around and concocting adorable outfits for my babies, but it's become rather hard on my budget to assemble exactly the right shoes and accessories I envision to pull an outfit together, hence my new-found interest in crafting.
What I hope to do here is compile ideas for things that a beginner can pull together easily with limited time and limited materials. I don't have a lot of time to do stuff without my one-year-old getting into it, nor do I have patience with projects that have too many steps or too much waiting time. I prefer to do things I can start and finish in one session rather than those I have to work on in shifts, though I may occasionally share a more involved project, provided the steps are simple enough for the inexperienced.
My crafting budget at the moment is microscopic to invisible, so my projects will probably be limited to things I can make using recycled materials from around the house or that I can buy very cheaply, like that glue gun referenced above. I don't really do thrift stores due to an entirely unreasonable, admittedly ridiculous, yet insurmountable aversion to stuff other people have worn or used. Instead, I try to save anything I can avoid throwing away that I think I can make something cooler out of with a minimum of fuss and mess.
I much prefer to make stuff that is useful or at least wearable, rather than purely decorative. All the better if it's both! I haven't yet had the confidence to give anything I've made as a gift, but maybe one day as I get more into this crafting thing, I will. It's a goal, I guess. I also plan on sharing recipes and cooking techniques that sound interesting to me, as well as projects that can be done with or for kids of different ages.
In both crafting and cooking, my style tends toward the semi-creative. What I mean by this is that I rarely follow someone else's instructions or recipe exactly. I take the idea or technique, and change something up with a creative twist to make it my own. Case in point, that red felt flower hair clip. I used her method for assembling the flower, but made it suit me better by using glue, combining two flowers side by side, hand-stitching the centers instead of sewing on buttons, skipping the leaf, and using them on a hair clip for an older child as opposed to a baby headband. I will give credit where it's due when applicable by sharing where I got my inspiration, and comment on how I would do it or how it worked out for me if I've tried it. I hate uploading pictures, so I can't say how many, if any, of my posts will include pictures. I have no idea if anyone will ever see this blog, so right now I am just looking at it as a holding pen for my ideas. But if you're out there, and you happen to be reading this, please say hi - and share your comments and ideas!
Subscribe to:
Posts (Atom)