I made them for a "Welcome New Baby" party, although it would be amazing for a baby shower as well. The inspiration that sparked this project's design was assembled and reinvented from a variety of different places across the web. It was a three day process. On the first day, I baked a Pink Velvet Cake from scratch based on this cupcake recipe from Taste of Home. I baked it in a 9"x13" pan, and increased the bake time by about 15 minutes. Instead of the vanilla extract called for in the recipe, though, I used strawberry extract, and increased the amount just a touch. I couldn't find any pink food coloring after checking 3 stores, so I just used red and added it drop by drop to make sure it didn't get too dark. I'm sure the color would have been prettier with the pink, though. I can't vouch for the texture of the cake since I made a mistake and only added 1/2 a cup of butter instead of 1 cup, and it was kind of heavy and a little bit doughy, yet dry. Hard to describe, but almost certainly my fault. The flavor was kind of bland, rather pound-cakey, I would say. I assume it would be even blander with plain vanilla extract as the original recipe directs, though you never know - after all, mine WAS missing half its butter. I was glad the cake was destined to become cake pops, as I figure the crumbling and mixing with frosting would render both taste and texture issues irrelevant. I didn't use the frosting given in the recipe. I wanted something that tasted awesome, since the frosting gets mixed with the cake and is therefore an integral part of the flavor. For that, there's only one way to go: cream cheese frosting, doctored up with strawberries. I used this recipe for the frosting only, not the cake part of the recipe. I used only 2 cups of the confectioners' sugar, since I was more concerned with taste than texture, and wanted the cheese and berry flavors to really shine through. It tasted pretty good, though it was kind of runny, so if you wanted to spread it between cake layers you'd probably have to thicken it with more sugar as the recipe states, or else it will run out the sides. But I'd be afraid that might make it overly sweet and less flavorful.
Anyway! Moving on. I crumbled the cake up and mashed it with just enough frosting to make it moldable. It didn't take much. I did it all in a closed Ziploc bag, so there was no mess from this part. When it was perfectly smooth, I shaped little balls using my cookie scoop. I dipped the tips of lollipop sticks (say that three times fast ;D) in a bit of melted white baking chocolate to help them stick, and stuck on in each ball. Obviously. Hence the name cake pops. But yeah, the melted chocolate makes it nice and secure when it dries.so the ball (hopefully) won't slide off the stick when you're dipping it.
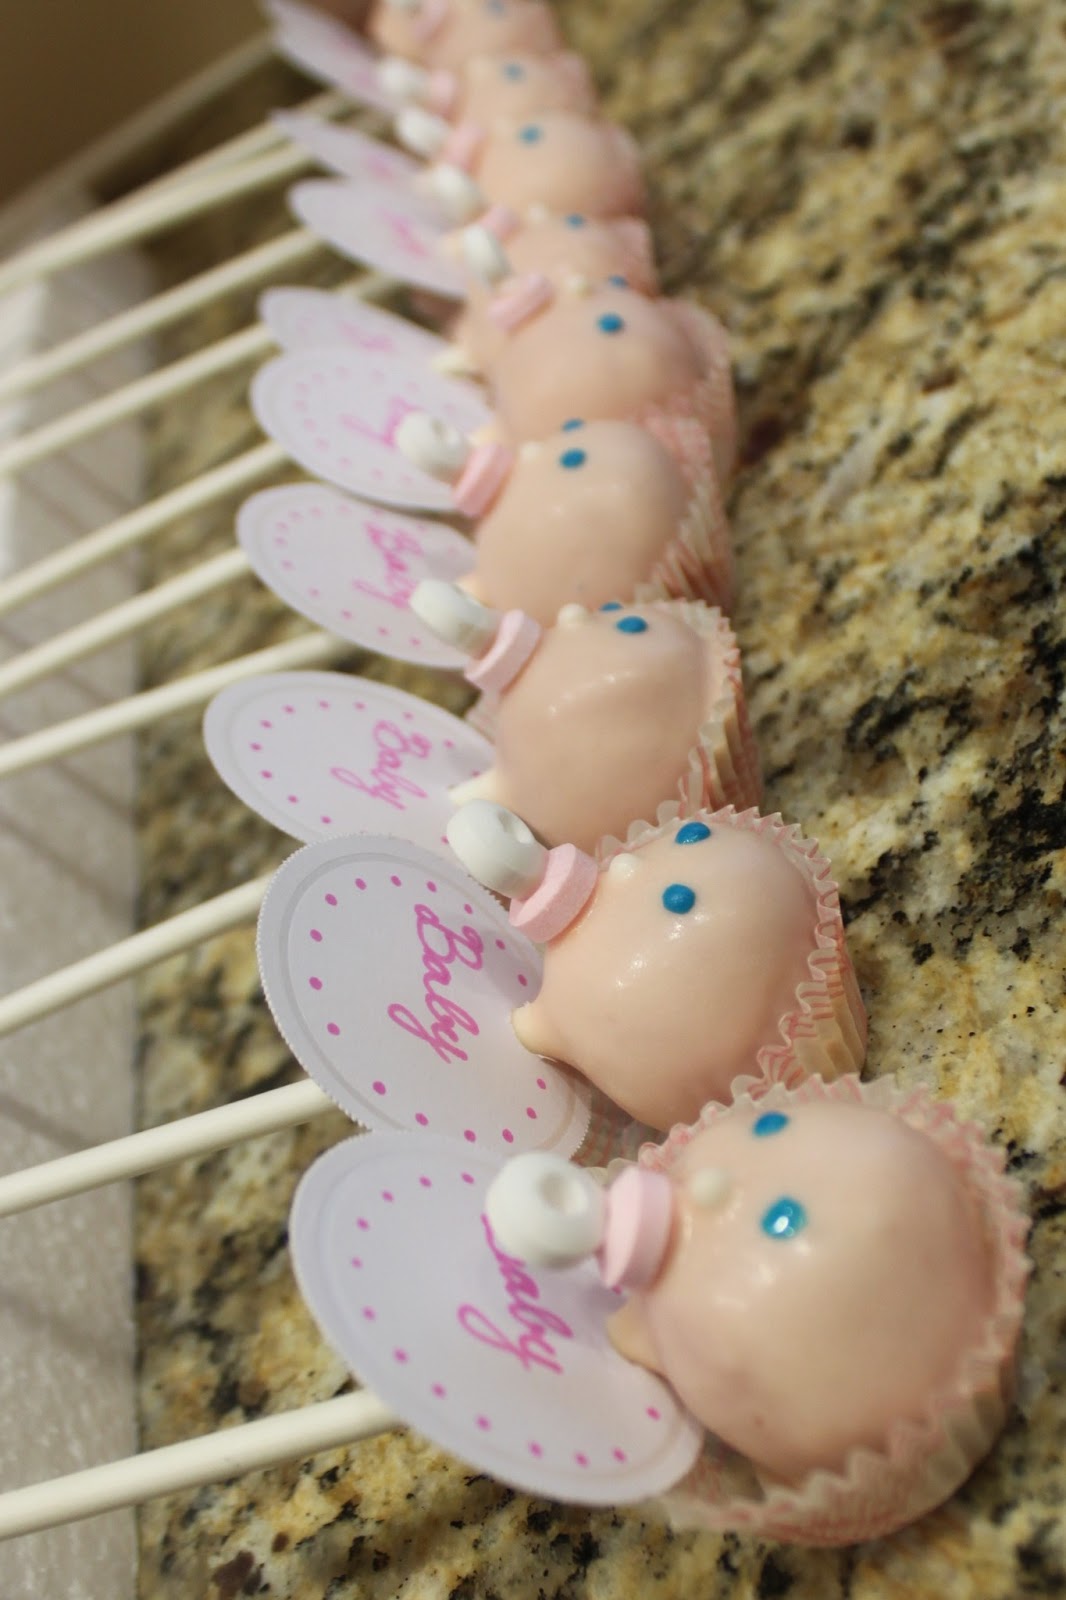
To decorate, I started by mixing white and orange candy melts plus a tiny bit of red to get a rosy flesh tone. I prefer my cake pops to have to coats for better coverage. So I first prepared an overturned cardboard box with little slits cut into it to stand the pops in while drying so the heads stay nice and round. I dipped, shook off the excess, and applied a little edible pearl in the center of each face to make little baby noses. I held and rotated each pop till no longer drippy, then stood them all in their slits in the box to dry overnight. Note: do NOT leave coated pops in the freezer to harden. Condensation will form on them, making them impossible to do anything else with, as the moisture will cause the candy melts to seize up. I wasted a lot of time tenderly drying each one with paper towels before continuing the process. So leave out at room temperature! The coating and frosting will keep the cake from drying out.
Today I spent several hours finally finishing the pops. I dipped each head in another layer of candy coating, then I stuck on little pacifiers made with candy beads from a candy necklace. I cut apart several candy necklaces to get enough pink and white candies for each paci. I used melted candy coating to stick a white candy ring in the center of a pink one, perpendicular to the pink, to form the pink base and white handle of a binky. I got the idea from Bakerella, the original cake pop queen, though I didn't bother with the mouths and rosy cheeks she made. Then I laid each baby sideways into a pink and white mini cupcake liner, which stuck to the coating as it hardened and became the baby's ruffled bonnet! I leaned the ends of the sticks on a piece of styrofoam while drying so they'd be lightly elevated, helping the bonnets stick on the heads at a good angle. The cupcake liner bonnet idea came from Veronika in the "Pop Stars" section of the Bakerella site. When dry, I piped on eyes using store bought blue writing icing that comes in a tube. Then I wanted to add bibs, as Bakerella does, but I don't currently have a functional printer. I wracked my brains awhile, then went out and poked around the stationery store a bit. I found round white heavy paper tags with little holes to attach a string or whatever. I bought a pink Sharpie permanent marker and wrote Baby in cursive letters on the center of the circles, then added a border of little pink dots all around. I needed to enlarge the holes with a manual hole puncher to get them to fit over the sticks, but when I slipped the bibs on my little babies, the effect was just precious. I covered a styrofoam block in pink crepe paper to use as a base. I crisscrossed pink folded tulle strips all over it in both directions and knotted them all along the 4 sides of the block, leaving a little tail to create poofy tutu-like effect. Then I added 3 narrow satin ribbon bows at the front with trailing tails as a finishing touch. I used the pointed end of a wooden skewer to poke holes to insert the pops without tearing the paper covering. I stood those babies on the base in 6 rows of 4 babies. Cutest thing ever!
No comments:
Post a Comment